5 Advanced Video Editing Techniques For The Pros

If you’re stepping into the big bad world of industrial video editing, then you’re going to need to have the proper techniques to impress future clients. What that means, if they want Hollywood-style feature films or an advert that touches people’s hearts, you’re going to need to know what special effects need to be used, what transitions you can do, and many other things. Of course, all of this comes with practice and time, but there are a few techniques you can learn how to create videos like a pro! So, here are 5 advanced video editing techniques that even professionals use every day.
Match Cuts

Photo Credits – https://www.adobe.com/sg/creativecloud/video/discover/match-cut.html
One of the most important techniques to learn is match cutting a scene together. So, say, for example, you’re working on a conversation, or your scene requires dramatic changes in scenery, using match cuts can help the scene look more natural and seamless. Think about all those TikTok videos, where the person in the video is wearing no makeup, they lift their arms, and when they bring them down again, their face is full of makeup. That’s what a match cut is. It cleverly disguises a cut transition as part of the movement in the scene.
However, note the word seamless, which means the cut must be undetectable. So, if you want to make your videos professional, you’ll need to make those transitions unnoticeable. That’s where markers come in. Using markers in your timeline doesn’t change the video you’re making. It is only a tool for you to know when to cut a clip and when to paste them together. So, when your character turns around to face a different location, you don’t cut your second clip too close to the beginning of the turn. It’ll repeat the action. Instead, you cut the second clip halfway through, so it seems like the turn is ending in another location.

We Can Help You With Professional Video Editing.
Unlimited Revisions – Whatever changes are needed, send them through and we will Fix them.
Fast Turnaround Time – We are always available to meet the tightest of deadlines when necessary.
Risk-Free Trial – Send your first video editing project to us and if you are not 100% happy with the results we produce, you don’t pay!
Tracking Masks
Photo Credits – https://helpx.adobe.com/premiere-pro/using/masking-tracking.html
If you’re editing a newsreel, or a documentary, blurring or pixelating a face, sensitive information, or even unnecessary information will be a common technique you’ll need to use. But, in many of these videos, the subject you’re blurring might be in a moving shot. For example, if your documentary is about a crime, you’ll need to blur the criminal’s or victim’s faces, and even sensitive information, especially during touring interviews. So, you’ll need to know how to keep the blur or pixelation on that subject as they’re moving about.
This is where the masking tool comes in. For example, when you’re placing a blur effect on your video, you can use the keyframe tools to help you keep the blur in place, even as the subject is moving. Sometimes the masking tool can automatically detect the movement, and they’ll come with options like “Position”, “Position & Rotation”, or “Position, Scale and Rotation”. These can be useful, but you will still need to adjust the mask frame by frame if the auto-detect function doesn’t modify the mask correctly.
Automated Sequence Editing
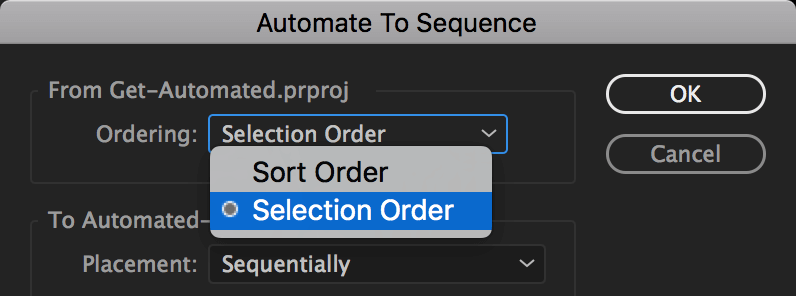
Photo Credits – https://premierebro.com/blog/automate-to-sequence-in-premiere-pro
One of the most intense video editing jobs is editing for music videos, especially for fast songs like dance tracks, EDM and even some Hip Hop. You’ll need to edit clips together to the beat of the music and not miss a single one. If you’re doing it manually (good luck!), it can be very frustrating because you’d have to match the beat to the frame, and sometimes getting the timing right is vital for the music video. So, that’s why many video editors will use automated sequencing.
Like with match cuts, you will need to use the marker tool to know where you want to cut the clips and how long they should last. Then, if you’re using an advanced video editing software, like Adobe Premiere Pro, you can use their automated sequence function, and they’ll cut the clips and insert them into your timeline for you. Then, all you need to do is choose the “bin” where your clips are held and choose which order you want them to be. Lastly, select the option that lets you place the clips according to your markers and watch the magic happen.
Use Proxy Files
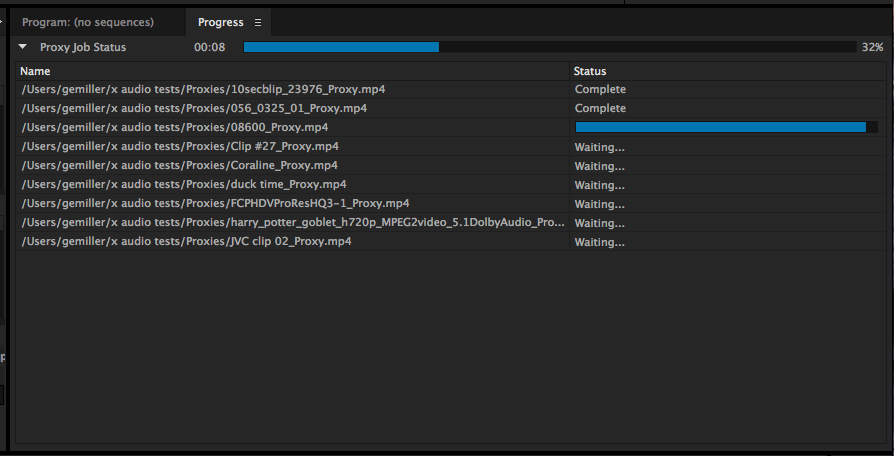
Photo Credits – https://helpx.adobe.com/si/premiere-pro/using/ingest-proxy-workflow.html
If you’re working with videos made with a 4K camera or higher, you’re going to need a lot of storage space for your video editing job. So, either get the latest model of video editing computers and laptops, extra storage space or use the best option. Use proxies. They’re not only a great way to save your video editing software, but you also won’t lose out on the quality and resolution of the original files in the final edit. Not only that, but you won’t corrupt the original files either.
Proxy files are exactly as they sound. They’re like substitutes for the original files until they can be converted back into the timeline again. They’re lower resolution, so your editing software doesn’t crash or slow down. This can happen with many high-resolution videos nowadays. So, before you start editing, import all your files into the software, and create proxy files for them. Most advanced video editing software, like Adobe Premiere Pro, will have an in-built function that will allow you to create them inside the app. So, there’s no need to make them yourselves!
Colour Grading
One of the most important aspects of video editing is colour grading. If you’re not familiar with the term, think about the filters you use on TikTok, Instagram, Facebook and Twitter. These filters are automated versions of colour grading technology. It is, in a nutshell, a way to correct the colour in your video so that the clips you’re using match each other. So, if you’re editing a film where the film crew shot a scene on two different days, you’ll need to make it look like they shot it all in one day. That’s why colour grading is vital in video editing.
In video editing history, colour grading used to be done using other apps, like Adobe After Effects or Lightworks. But thankfully, many video editing software, like Adobe Premiere Pro, now have these functions, so you don’t need to import, export, or share your timelines with other apps. All you need to do is learn how to match colours, improve saturation and vividness, and track motion. It’s a steep learning curve, but once you get the hang of it, you’ll be colour grading like a pro in no time.
Related Articles:


